|
| |
PROTECTION DATA SHEET |
| |
DS3 12mm SABS Category 2 Strongroom Door |
|
|
Details for Architect / Contractor / User |
| |
MEDIUM TYPE |
| This anti-explosive quality door is designed to afford protection against
various skilled methods of burglary. The door is widely used to protect
valuables against fire and burglars in post offices, police stations, prisons
and other Government offices. |
| |
| Specifications: |
| Door: Overall thickness: 106mm. |
| Outer plate: 12mm. |
| Boltwork: 7 bolts of 32mm diameter, 4 front and 3 back. |
| Locking: 7-lever security keylock. |
| (Combination lock as optional extra) |
| Fire Protection: Mutual non-deteriorating insulation material. |
| Finish: Rust-proof undercoat for final painting by contractors. |
| Mass: Approximately 380kg. |
| Hand Left or right opening outwards. |
| Walls: 110mm or more - brick or concrete. |
| |
|
| |
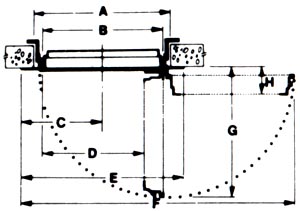
| Dimensions: |
| A |
Wall opening: 1932 x 830mm. |
| B |
Clear opening: (door open 180°) 1 860 x 750mm. |
| C |
Centre line of door opening to edge of frame: 474mm. |
| D |
Clear opening: (door open 90°) 680mm. |
| E |
Over door frame: 1 970 x 950mm. |
| F |
Overall width of door and frame: (door open 180°) 1 720mm. |
| G |
Projection of door: (open 90°) 850mm. |
| H |
Projection of door: (open at 180°) 150mm. |
| |
|
| All Mutual doors are manufactured in South Africa. we have
a policy of constant improvement, therefore we reserve the right to alter
any part of the specification outlined without incurring liability. Mutual
equipment is fully approved by security equipment authorities, local as
well as abroad. |
| |
| |
BUILDING-IN INSTRUCTIONS FOR MUTUAL RECORD ROOM DOORS & STRONG
ROOM DOORS |
| |
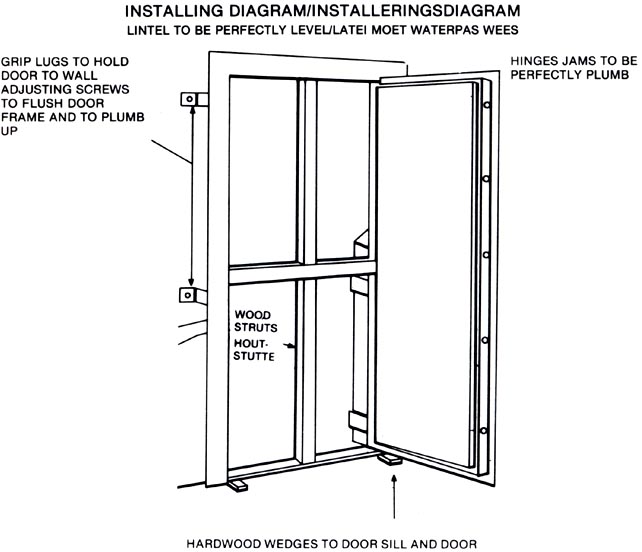
INSTALLING DIAGRAM |
LINTEL TO BE PERFECTLY LEVEL |
| |
|
| |
| To ensure trouble-free operation of the Door it is important
to note that the Wall Opening should first be prepared to the correct size
(SEE HERE_UNDER) and the site should then be removed and the frame, WITH
THE DOOR IN CLOSED POSITION AND BOLTS THROWN, upended into the opening
and the grip lugs replaced. |
| |
ON NO ACCOUNT SHOULD THE DOOR BE PLACED
IN POSITION AND THE WALLS BUILT AROUND IT. |
| |
| Check with plumb level to ensure that the frame is upright,
square and free from twist; place shims between Door and Frame intermittently
to ensure minimum clearance. It is essential that the frame be set truly
and plumb both ways. |
| |
| When
the Door opens and closes freely and the bolts work easily, secure the
Door in position and place vertical and horizontal struts
inside the frame as shown in sketch - SEE RIGHT TOP. Now grout in the door.
The struts are necessary to prevent the door frame bulging inwards while
the grouting is setting. The Door must remain wedged open at 90° to take
the weight off the frame until the grouting is set. |
| |
IMPORTANT |
| |
| This door is finished to the undercoat only. When painting,
care should be taken to avoid paint coming into contact with the locking
bolts. paint on the locking bolts may cause difficulty in opening the Door.
The leading edges of the door should only be painted lightly to ensure
easy closing. |
| |
| ALL DOORS ARE THOROUGHLY INSPECTED AND GUARANTEED TO BE 100%
PERFECT BEFORE LEAVING THE FACTORY. |
| WE CANNOT THEREFORE ACCEPT RESPONSIBILITY FOR BAD FITTING
OR OTHER FAULTS WHICH MAY OCCUR AFTER INSTALLATION UNLESS OUR BUILDING-IN
INSTRUCTIONS HAVE BEEN ADHERED TO. |